Android to Arduino Data Send via Bluetooth Serial – Part 2
Now we are going to load up Eclipse and make a simple app to connect to our Bluetooth enabled Arduino. The first stage will be to make an activity to select an already paired BT device. Once working we will make another activity that will do something with that selected device in part 3.
Set up a new project named “simple bluetooth” with a minimum api of 8 and target of 18. Let eclipse make a main activity and name it “Device List”. Do not add a navigation type. Hit finish and let it all load up.
I have structured this so that we will get the manifest and layout files out of the way first and then tackle the activity programming.
Open up the file explorer for your new project and open the manifest file. Add Bluetooth permissions to your manifest under the declaration. I won't post whole files of code for some things as it takes up a lot of room. There is a downloadable file of the full project at the end of the final part if you wish to see complete xml files etc.
<uses-sdk android:minSdkVersion="8" android:targetSdkVersion="18" />

<uses-permission android:name="android.permission.BLUETOOTH"/> <uses-permission android:name="android.permission.BLUETOOTH\_ADMIN"/>
We don't need the ADMIN permission for this app but put it in anyway in case you get adventurous later. The times I have forgotten this step is unforgivable. Manifest done.
In the res/layout directory find your activity_device_list layout file. Delete the hello world stuff and put in a listView and 3 textViews. The listView will show our paired devices and the textViews are there to show instruction and information useful to the user..
<?xml version="1.0" encoding="utf-8"?> <LinearLayout xmlns:android="http://schemas.android.com/apk/res/android" android:orientation="vertical" android:layout\_width="match\_parent" android:layout\_height="match\_parent" > <TextView android:id="@+id/title\_paired\_devices" android:layout\_width="match\_parent" android:layout\_height="wrap\_content" android:textAppearance="?android:attr/textAppearanceLarge" android:text="Select btSerial device from paired devices:" android:visibility="gone" android:background="#666" android:textColor="#fff" android:paddingLeft="5dp" /> <ListView android:id="@+id/paired\_devices" android:layout\_width="match\_parent" android:layout\_height="wrap\_content" android:stackFromBottom="false" android:layout\_weight="1" />

<TextView android:id="@+id/connecting" android:layout\_width="wrap\_content" android:layout\_height="wrap\_content" android:textAppearance="?android:attr/textAppearanceLarge" />

<TextView android:id="@+id/infoText" android:layout\_width="wrap\_content" android:layout\_height="wrap\_content" android:text="If no devices are listed please pair your device in Android settings" android:textAppearance="?android:attr/textAppearanceLarge" />

<LinearLayout android:layout\_width="match\_parent" android:layout\_height="wrap\_content" android:gravity="center">

</LinearLayout>

</LinearLayout>
You will notice some yellow warnings underneath where I have used text strings. Usually I would suggest using the strings.xml in the values folder to keep all text strings and then reference to them via r.id but as this is a simple example I didn't want to deviate from the main point.
That paragraph was quite the deviation. In the layout directory add another xml layout file called device_name (remember to have.xml end the filename). This will be used for the actual device names populating the list.
<?xml version="1.0" encoding="utf-8"?> <TextView xmlns:android="http://schemas.android.com/apk/res/android" android:layout\_width="match\_parent" android:layout\_height="wrap\_content" android:textSize="18sp" android:padding="5dp">

</TextView>
Now that all the layouts are complete we can move on to programming the Device List activity. This activity is based on the Google Chat example but has been slimmed down and simplified so there is a little less to learn. Functionality wise it will generate a list of the paired devices on an Android device. From there we will add the ability to pick a paired device and take its details through to a new activity, where we will send data to the Arduino.
Below is the code from the Device List activity. I have tried to comment as much as I can to give answers on what each bit of code is doing, rather than explain it all in one big paragraph here. I won't go in to every detail, instead I will focus on the bits exclusive to the functionality of this app. The main parts to focus on are getting the bluetooth adapter for the device and setting up the array adapter and the list view. Paired devices are then retrieved from the Bluetooth adapter and added to the array adapter, which in turn are displayed using the list view.
package com.example.simplebluetooth; import java.util.Set; import android.app.Activity; import android.bluetooth.BluetoothAdapter; import android.bluetooth.BluetoothDevice; import android.content.Intent; import android.os.Bundle; import android.view.View; import android.widget.AdapterView; import android.widget.AdapterView.OnItemClickListener; import android.widget.ArrayAdapter; import android.widget.ListView; import android.widget.TextView; import android.widget.Toast; public class DeviceListActivity extends Activity {
    // textview for connection status
    TextView textConnectionStatus; ListView pairedListView;
    // Member fields
    private BluetoothAdapter mBtAdapter;
    private ArrayAdapter<String> mPairedDevicesArrayAdapter;

    @Override protected void onCreate(Bundle savedInstanceState) {
        super.onCreate(savedInstanceState);
        setContentView(R.layout.activity\_device\_list);
        textConnectionStatus = (TextView) findViewById(R.id.connecting); textConnectionStatus.setTextSize(40);

        // Initialize array adapter for paired devices
        mPairedDevicesArrayAdapter = new ArrayAdapter<String>(this, R.layout.device\_name);
        // Find and set up the ListView for paired devices
        pairedListView = (ListView) findViewById(R.id.paired\_devices);
        pairedListView.setAdapter(mPairedDevicesArrayAdapter);
    }

    @Override public void onResume() {
        super.onResume();
        //It is best to check BT status at onResume in case something has changed while app was paused etc
        checkBTState();
        mPairedDevicesArrayAdapter.clear();
        // clears the array so items aren't duplicated when resuming from onPause

textConnectionStatus.setText(" ");
//makes the textview blank

// Get the local Bluetooth adapter
mBtAdapter = BluetoothAdapter.getDefaultAdapter();

// Get a set of currently paired devices and append to pairedDevices list
Set<BluetoothDevice> pairedDevices = mBtAdapter.getBondedDevices();

// Add previously paired devices to the array
if (pairedDevices.size() > 0) {
    findViewById(R.id.title\_paired\_devices).setVisibility(View.VISIBLE);
    //make title viewable
    for (BluetoothDevice device : pairedDevices) {
        mPairedDevicesArrayAdapter.add(device.getName() + "\\n" + device.getAddress());
    }
} else {
    mPairedDevicesArrayAdapter.add("no devices paired");
}
}

//method to check if the device has Bluetooth and if it is on.
//Prompts the user to turn it on if it is off
private void checkBTState() {
    // Check device has Bluetooth and that it is turned on
    mBtAdapter=BluetoothAdapter.getDefaultAdapter();
    // CHECK THIS OUT THAT IT WORKS!!!
    if(mBtAdapter==null) {
        Toast.makeText(getBaseContext(), "Device does not support Bluetooth", Toast.LENGTH\_SHORT).show();
        finish();
    } else {
        if (!mBtAdapter.isEnabled()) {
            //Prompt user to turn on Bluetooth
            Intent enableBtIntent = new Intent(BluetoothAdapter.ACTION\_REQUEST\_ENABLE); startActivityForResult(enableBtIntent, 1);
        }
    }
}
}
Now run the App on your device. Make sure your BT module has already been paired in settings and that it is on. I would leave BT off to check that the app correctly prompts you to turn it on. Once BT is enable and the app starts up you should see something similar to the below. You will see I changed the name of my BT module to 'btserial' for this tutorial.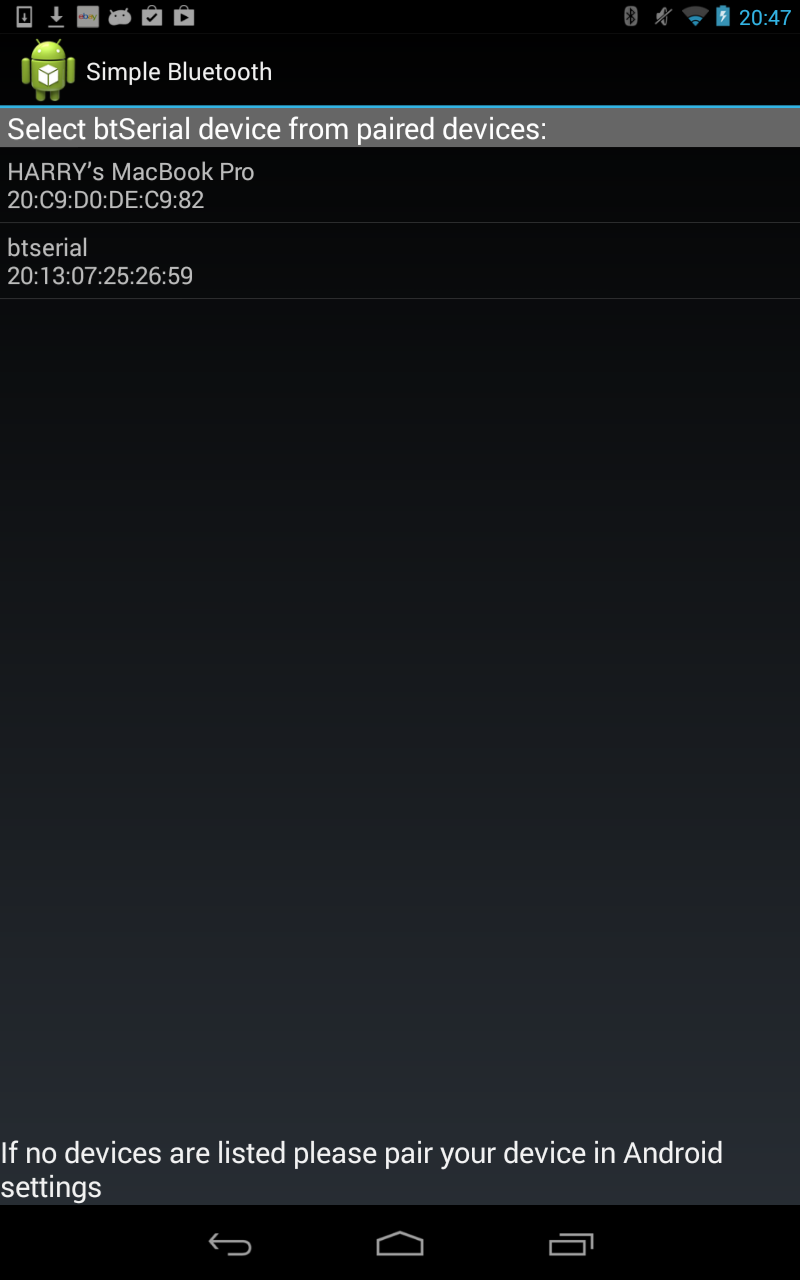
As useful as this is it doesn't currently do anything with our Arduino, which isn't ideal. So in part 3 we will create a new activity that will talk to our BT enabled Arduino. Have a break and look at a cat or something, then move on to part 3.