Android to Arduino Data Send via Bluetooth Serial – Part 3
Now to make our app actually do something useful with out BT enabled Arduino. Before we make the new activity a few changes must be made to the Device List activity to support the new activity we are about to make.
First, an intent EXTRA is needed to take the chosen device's MAC address to the next activity. Just put this with all the the other declarations at the top of the class
//An EXTRA to take the device MAC to the next activity
public static String EXTRA_DEVICE_ADDRESS;
An onClick listener will then be added for the list view so that a device can be selected from the list. Inside the method triggered by the list selection the BT device MAC address will be parsed from the data in the listview and a new Intent will be instantiated to call the ArduinoMain activity. I put this at the bottom of my DeviceListActivity class.
private OnItemClickListener mDeviceClickListener = new OnItemClickListener() { public void onItemClick(AdapterView<?> av, View v, int arg2, long arg3) { textConnectionStatus.setText("Connecting..."); // Get the device MAC address, which is the last 17 chars in the View
String info = ((TextView) v).getText().toString();
String address = info.substring(info.length() - 17);

// Make an intent to start next activity while taking an extra which is the MAC address.
Intent i = new Intent(DeviceListActivity.this, ArduinoMain.class); i.putExtra(EXTRA\_DEVICE\_ADDRESS, address); startActivity(i); } };
Lastly we need to attach the new onClick listener to the list view so the Listview set up in onCreate should look like the below. (add the bottom line to your code, nothing else has changed)
// Find and set up the ListView for paired devices
ListView pairedListView = (ListView) findViewById(R.id.paired\_devices);
pairedListView.setAdapter(mPairedDevicesArrayAdapter);
pairedListView.setOnItemClickListener(mDeviceClickListener);
That is Device List activity done so on to the new activity. But just in case you are unsure here is the finished code.
package com.example.simplebluetooth;
import java.util.Set;
import android.app.Activity;
import android.bluetooth.BluetoothAdapter;
import android.bluetooth.BluetoothDevice;
import android.content.Intent;
import android.os.Bundle;
import android.view.View;
import android.widget.AdapterView;
import android.widget.AdapterView.OnItemClickListener;
import android.widget.ArrayAdapter;
import android.widget.ListView;
import android.widget.TextView;
import android.widget.Toast;

public class DeviceListActivity extends Activity {
  // textview for connection status
  TextView textConnectionStatus; ListView pairedListView; //An EXTRA to take the device MAC to the next activity
  public static String EXTRA\_DEVICE\_ADDRESS; // Member fields
  private BluetoothAdapter mBtAdapter;
  private ArrayAdapter<String> mPairedDevicesArrayAdapter;

  @Override protected void onCreate(Bundle savedInstanceState) {
    super.onCreate(savedInstanceState);
    setContentView(R.layout.activity\_device\_list);
    textConnectionStatus = (TextView) findViewById(R.id.connecting);
    textConnectionStatus.setTextSize(40); // Initialize array adapter for paired devices
    mPairedDevicesArrayAdapter = new ArrayAdapter<String>(this, R.layout.device\_name); // Find and set up the ListView for paired devices
    pairedListView = (ListView) findViewById(R.id.paired\_devices); pairedListView.setOnItemClickListener(mDeviceClickListener);
    pairedListView.setAdapter(mPairedDevicesArrayAdapter);
  }

  @Override public void onResume() { super.onResume(); //It is best to check BT status at onResume in case something has changed while app was paused etc
  checkBTState();
  mPairedDevicesArrayAdapter.clear();// clears the array so items aren't duplicated when resuming from onPause

textConnectionStatus.setText(" "); //makes the textview blank

// Get the local Bluetooth adapter
mBtAdapter = BluetoothAdapter.getDefaultAdapter(); // Get a set of currently paired devices and append to pairedDevices list
Set<BluetoothDevice> pairedDevices = mBtAdapter.getBondedDevices(); // Add previously paired devices to the array
if (pairedDevices.size() > 0) {
  findViewById(R.id.title\_paired\_devices).setVisibility(View.VISIBLE);//make title viewable for
  (BluetoothDevice device : pairedDevices) {
    mPairedDevicesArrayAdapter.add(device.getName() + "\\n" + device.getAddress());
    }
  } else {
    mPairedDevicesArrayAdapter.add("no devices paired"); } } //method to check if the device has Bluetooth and if it is on. //Prompts the user to turn it on if it is off
    private void checkBTState() {
      // Check device has Bluetooth and that it is turned on
      mBtAdapter=BluetoothAdapter.getDefaultAdapter(); // CHECK THIS OUT THAT IT WORKS!!!
      if(mBtAdapter==null) {
        Toast.makeText(getBaseContext(), "Device does not support Bluetooth", Toast.LENGTH\_SHORT).show();
        finish();
      } else {
        if (!mBtAdapter.isEnabled()) {
           //Prompt user to turn on Bluetooth
           Intent enableBtIntent = new Intent(BluetoothAdapter.ACTION\_REQUEST\_ENABLE); startActivityForResult(enableBtIntent, 1);
           }
        }
    }

    // Set up on-click listener for the listview
    private OnItemClickListener mDeviceClickListener = new OnItemClickListener() {
      public void onItemClick(AdapterView<?> av, View v, int arg2, long arg3) {
        textConnectionStatus.setText("Connecting...");
        // Get the device MAC address, which is the last 17 chars in the View
        String info = ((TextView) v).getText().toString();
        String address = info.substring(info.length() - 17);

        // Make an intent to start next activity while taking an extra which is the MAC address.
        Intent i = new Intent(DeviceListActivity.this, ArduinoMain.class);
        i.putExtra(EXTRA\_DEVICE\_ADDRESS, address);
        startActivity(i);
      }
    };
  }
Create a new, blank Android activity in eclipse and name it ArduinoMain. All other things remain default. Open the layout file for the activity (this should be acticity_arduino_main). All we really need at first is two buttons for functions 1 & 2, and an editText field to enter text we want to send to the LCD screen. Add these features to the xml file so it looks like the one below.
<RelativeLayout xmlns:android="http://schemas.android.com/apk/res/android" xmlns:tools="http://schemas.android.com/tools" android:layout\_width="match\_parent" android:layout\_height="match\_parent" android:paddingBottom="@dimen/activity\_vertical\_margin" android:paddingLeft="@dimen/activity\_horizontal\_margin" android:paddingRight="@dimen/activity\_horizontal\_margin" android:paddingTop="@dimen/activity\_vertical\_margin" tools:context=".ArduinoMain" >

<EditText android:id="@+id/editText1" android:layout\_width="fill\_parent" android:layout\_height="wrap\_content" android:layout\_marginTop="0dp" android:layout\_weight="2" android:ems="10" android:hint="Enter some text" android:imeOptions="actionSend" android:singleLine="true" />

<Button android:id="@+id/functionOne" android:layout\_width="wrap\_content" android:layout\_height="wrap\_content" android:layout\_centerHorizontal="true" android:layout\_marginTop="104dp" android:text="Function 1" />

<Button android:id="@+id/functionTwo" android:layout\_width="wrap\_content" android:layout\_height="wrap\_content" android:layout\_alignLeft="@+id/functionOne" android:layout\_below="@+id/functionOne" android:layout\_marginTop="67dp" android:text="Function 2" />

</RelativeLayout>
If you have a look at the editText attributes you will see I have opted to include a send key on the soft keyboard. This way we don't need to waste a button on sending our text! It will all look like the below when finished. Note that I have optimised this for a Nexus 7. 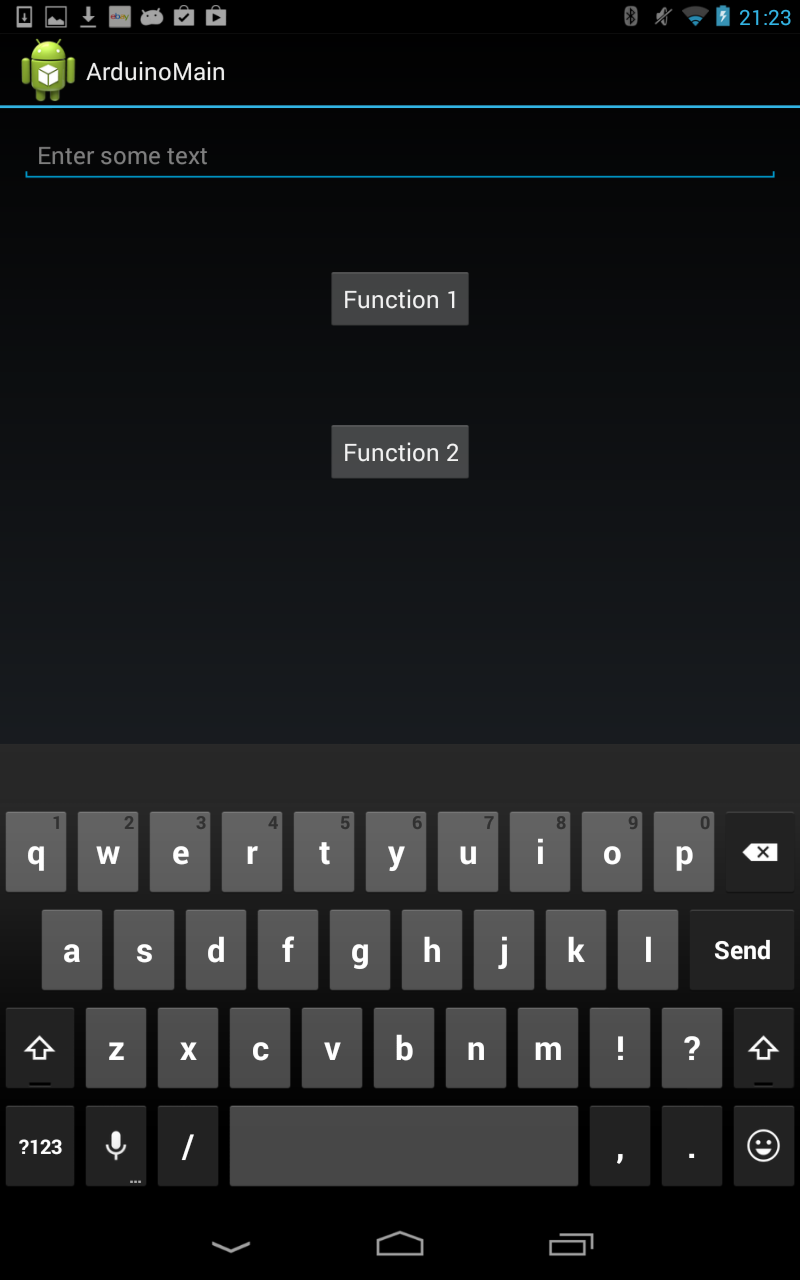
Now on to the Arduino Main activity java file. Open it up (src/com.example...) and get ready to get coding. To set up a Bluetooth connection we need to do a few things:
1. Initialise the buttons and add onClick listeners
2. Set a pointer to the BT device using its MAC address
3. Open a BT socket for communication with the BT device.
4. Create a data outstream so we can send data to the BT device.
5. Create a method to send data down the outstream.
6. Tidy up the process with proper use of onResume, onPause so that the BT connection is not wasting resources.
Before looking at the code below I would strongly recommend looking at the Android Developer Bluetooth documentation. It gives clear instruction on how communication is made. Its very helpful, they are Google after all. But without further delay lets write this activity!
Below is the code for the ArduinoMain activity. As usual I have commented in the code to show what is going on but send me any questions if it isn't clear.
package com.example.simplebluetooth;

import java.io.IOException;

import java.io.OutputStream; import java.util.UUID;

import android.app.Activity;
import android.bluetooth.BluetoothAdapter;
import android.bluetooth.BluetoothDevice;
import android.bluetooth.BluetoothSocket;
import android.content.Intent;
import android.os.Bundle;
import android.view.KeyEvent;
import android.view.View;
import android.view.View.OnClickListener;
import android.view.View.OnKeyListener;
import android.widget.Button;
import android.widget.EditText;
import android.widget.Toast;

public class ArduinoMain extends Activity {

//Declare buttons & editText Button functionOne, functionTwo;

private EditText editText;

//Memeber Fields
private BluetoothAdapter btAdapter = null;
private BluetoothSocket btSocket = null;
private OutputStream outStream = null;

// UUID service - This is the type of Bluetooth device that the BT module is // It is very likely yours will be the same, if not google UUID for your manufacturer
private static final UUID MY\_UUID = UUID.fromString("00001101-0000-1000-8000-00805F9B34FB");

// MAC-address of Bluetooth module public String newAddress = null;

@Override public void onCreate(Bundle savedInstanceState) {
  super.onCreate(savedInstanceState); setContentView(R.layout.activity\_arduino\_main);addKeyListener();
  //Initialising buttons in the view //
  mDetect = (Button) findViewById(R.id.mDetect);
  functionOne = (Button) findViewById(R.id.functionOne);
  functionTwo = (Button) findViewById(R.id.functionTwo);
  //getting the bluetooth adapter value and calling checkBTstate
  btAdapter = BluetoothAdapter.getDefaultAdapter(); checkBTState();
  //Buttons are set up with onclick listeners so when pressed a method is called \* In this case send data is called with a value and a toast is made \* to give visual feedback of the selection made \*/

functionOne.setOnClickListener(new OnClickListener() { public void onClick(View v) { sendData("1"); Toast.makeText(getBaseContext(), "Function 1", Toast.LENGTH\_SHORT).show(); } });

functionTwo.setOnClickListener(new OnClickListener() { public void onClick(View v) { sendData("2"); Toast.makeText(getBaseContext(), "Function 2", Toast.LENGTH\_SHORT).show(); } }); }

@Override public void onResume() {
  super.onResume(); // connection methods are best here in case program goes into the background etc

  //Get MAC address from DeviceListActivity
  Intent intent = getIntent(); newAddress = intent.getStringExtra(DeviceListActivity.EXTRA\_DEVICE\_ADDRESS);
  // Set up a pointer to the remote device using its address.
  BluetoothDevice device = btAdapter.getRemoteDevice(newAddress);
  //Attempt to create a bluetooth socket for comms
  try { btSocket = device.createRfcommSocketToServiceRecord(MY\_UUID); } catch (IOException e1) {
    Toast.makeText(getBaseContext(), "ERROR - Could not create Bluetooth socket", Toast.LENGTH\_SHORT).show();
  }
  // Establish the connection.
  try { btSocket.connect(); } catch (IOException e) { try { btSocket.close();
  //If IO exception occurs attempt to close socket
  } catch (IOException e2) { Toast.makeText(getBaseContext(), "ERROR - Could not close Bluetooth
  socket", Toast.LENGTH\_SHORT).show();
  }
  }
  // Create a data stream so we can talk to the device
  try { outStream = btSocket.getOutputStream(); } catch (IOException e) {
    Toast.makeText(getBaseContext(), "ERROR - Could not create bluetooth outstream", Toast.LENGTH\_SHORT).show();
  }
  //When activity is resumed, attempt to send a piece of junk data ('x') so that it will fail if not connected // i.e don't wait for a user to press button to recognise connection failure
  sendData("x");
  }

@Override public void onPause() { super.onPause();
//Pausing can be the end of an app if the device kills it or the user doesn't open it again
//close all connections so resources are not wasted

//Close BT socket to device
try { btSocket.close(); } catch (IOException e2) { Toast.makeText(getBaseContext(), "ERROR - Failed to close Bluetooth socket", Toast.LENGTH\_SHORT).show(); } } //takes the UUID and creates a comms socket
private BluetoothSocket createBluetoothSocket(BluetoothDevice device) throws IOException {

return device.createRfcommSocketToServiceRecord(MY\_UUID);
}

//same as in device list activity
private void checkBTState() {
  // Check device has Bluetooth and that it is turned on
  if(btAdapter==null) { Toast.makeText(getBaseContext(), "ERROR - Device does not support bluetooth", Toast.LENGTH\_SHORT).show(); finish(); } else { if (btAdapter.isEnabled()) { } else { //Prompt user to turn on
  Bluetooth Intent enableBtIntent = new Intent(BluetoothAdapter.ACTION\_REQUEST\_ENABLE); startActivityForResult(enableBtIntent, 1); } } }

// Method to send data
private void sendData(String message) { byte\[\] msgBuffer = message.getBytes();

try { //attempt to place data on the outstream to the BT device
outStream.write(msgBuffer); } catch (IOException e) {
  //if the sending fails this is most likely because device is no longer there
  Toast.makeText(getBaseContext(), "ERROR - Device not found", Toast.LENGTH\_SHORT).show(); finish(); } } public void addKeyListener() {
// get edittext component
editText = (EditText) findViewById(R.id.editText1);

// add a keylistener to keep track user input
editText.setOnKeyListener(new OnKeyListener() { public boolean onKey(View v, int keyCode, KeyEvent event) {

// if keydown and send is pressed implement the sendData method
if ((keyCode == KeyEvent.KEYCODE\_ENTER) && (event.getAction() == KeyEvent.ACTION\_DOWN)) {
  //I have put the \* in automatically so it is no longer needed when entering text
  sendData('\*' + editText.getText().toString()); Toast.makeText(getBaseContext(), "Sending text", Toast.LENGTH\_SHORT).show();

return true; }

return false; } }); }

}
Now you have all that completed lets give it a go! Turn on your Arduino with the the BT module connected and code loaded up. Plug in your Android device to your PC/mac and run the project. Select your BT serial device from the paired list in the app and a new activity should open with two buttons and an editTextbox. Give it a go and send some text and it should pop up on the LCD screen. If so, give the buttons a press and make sure they trigger functions one and two.
There are obviously plenty of things that can be done with this type of functionality (remotes etc) so get adding buttons and extra functions to the Arduino. In The next article we will switch things up a bit though and add receiving comms to the app, which is a bit more fun (tricky).
Comment if there are any errors or if some bits need expanding upon, as when this was written I was the only audience.