RFduino & iOS - Sending large strings
I have been playing with the RFduino and IOS again. One small limitation of the RFduino is that it can only send 20 bytes of data at a time .
In this post I will show you a little sketch and iOS app I made to send long strings to an RFduino and display them on an LCD display. By the end you will have something like the below:
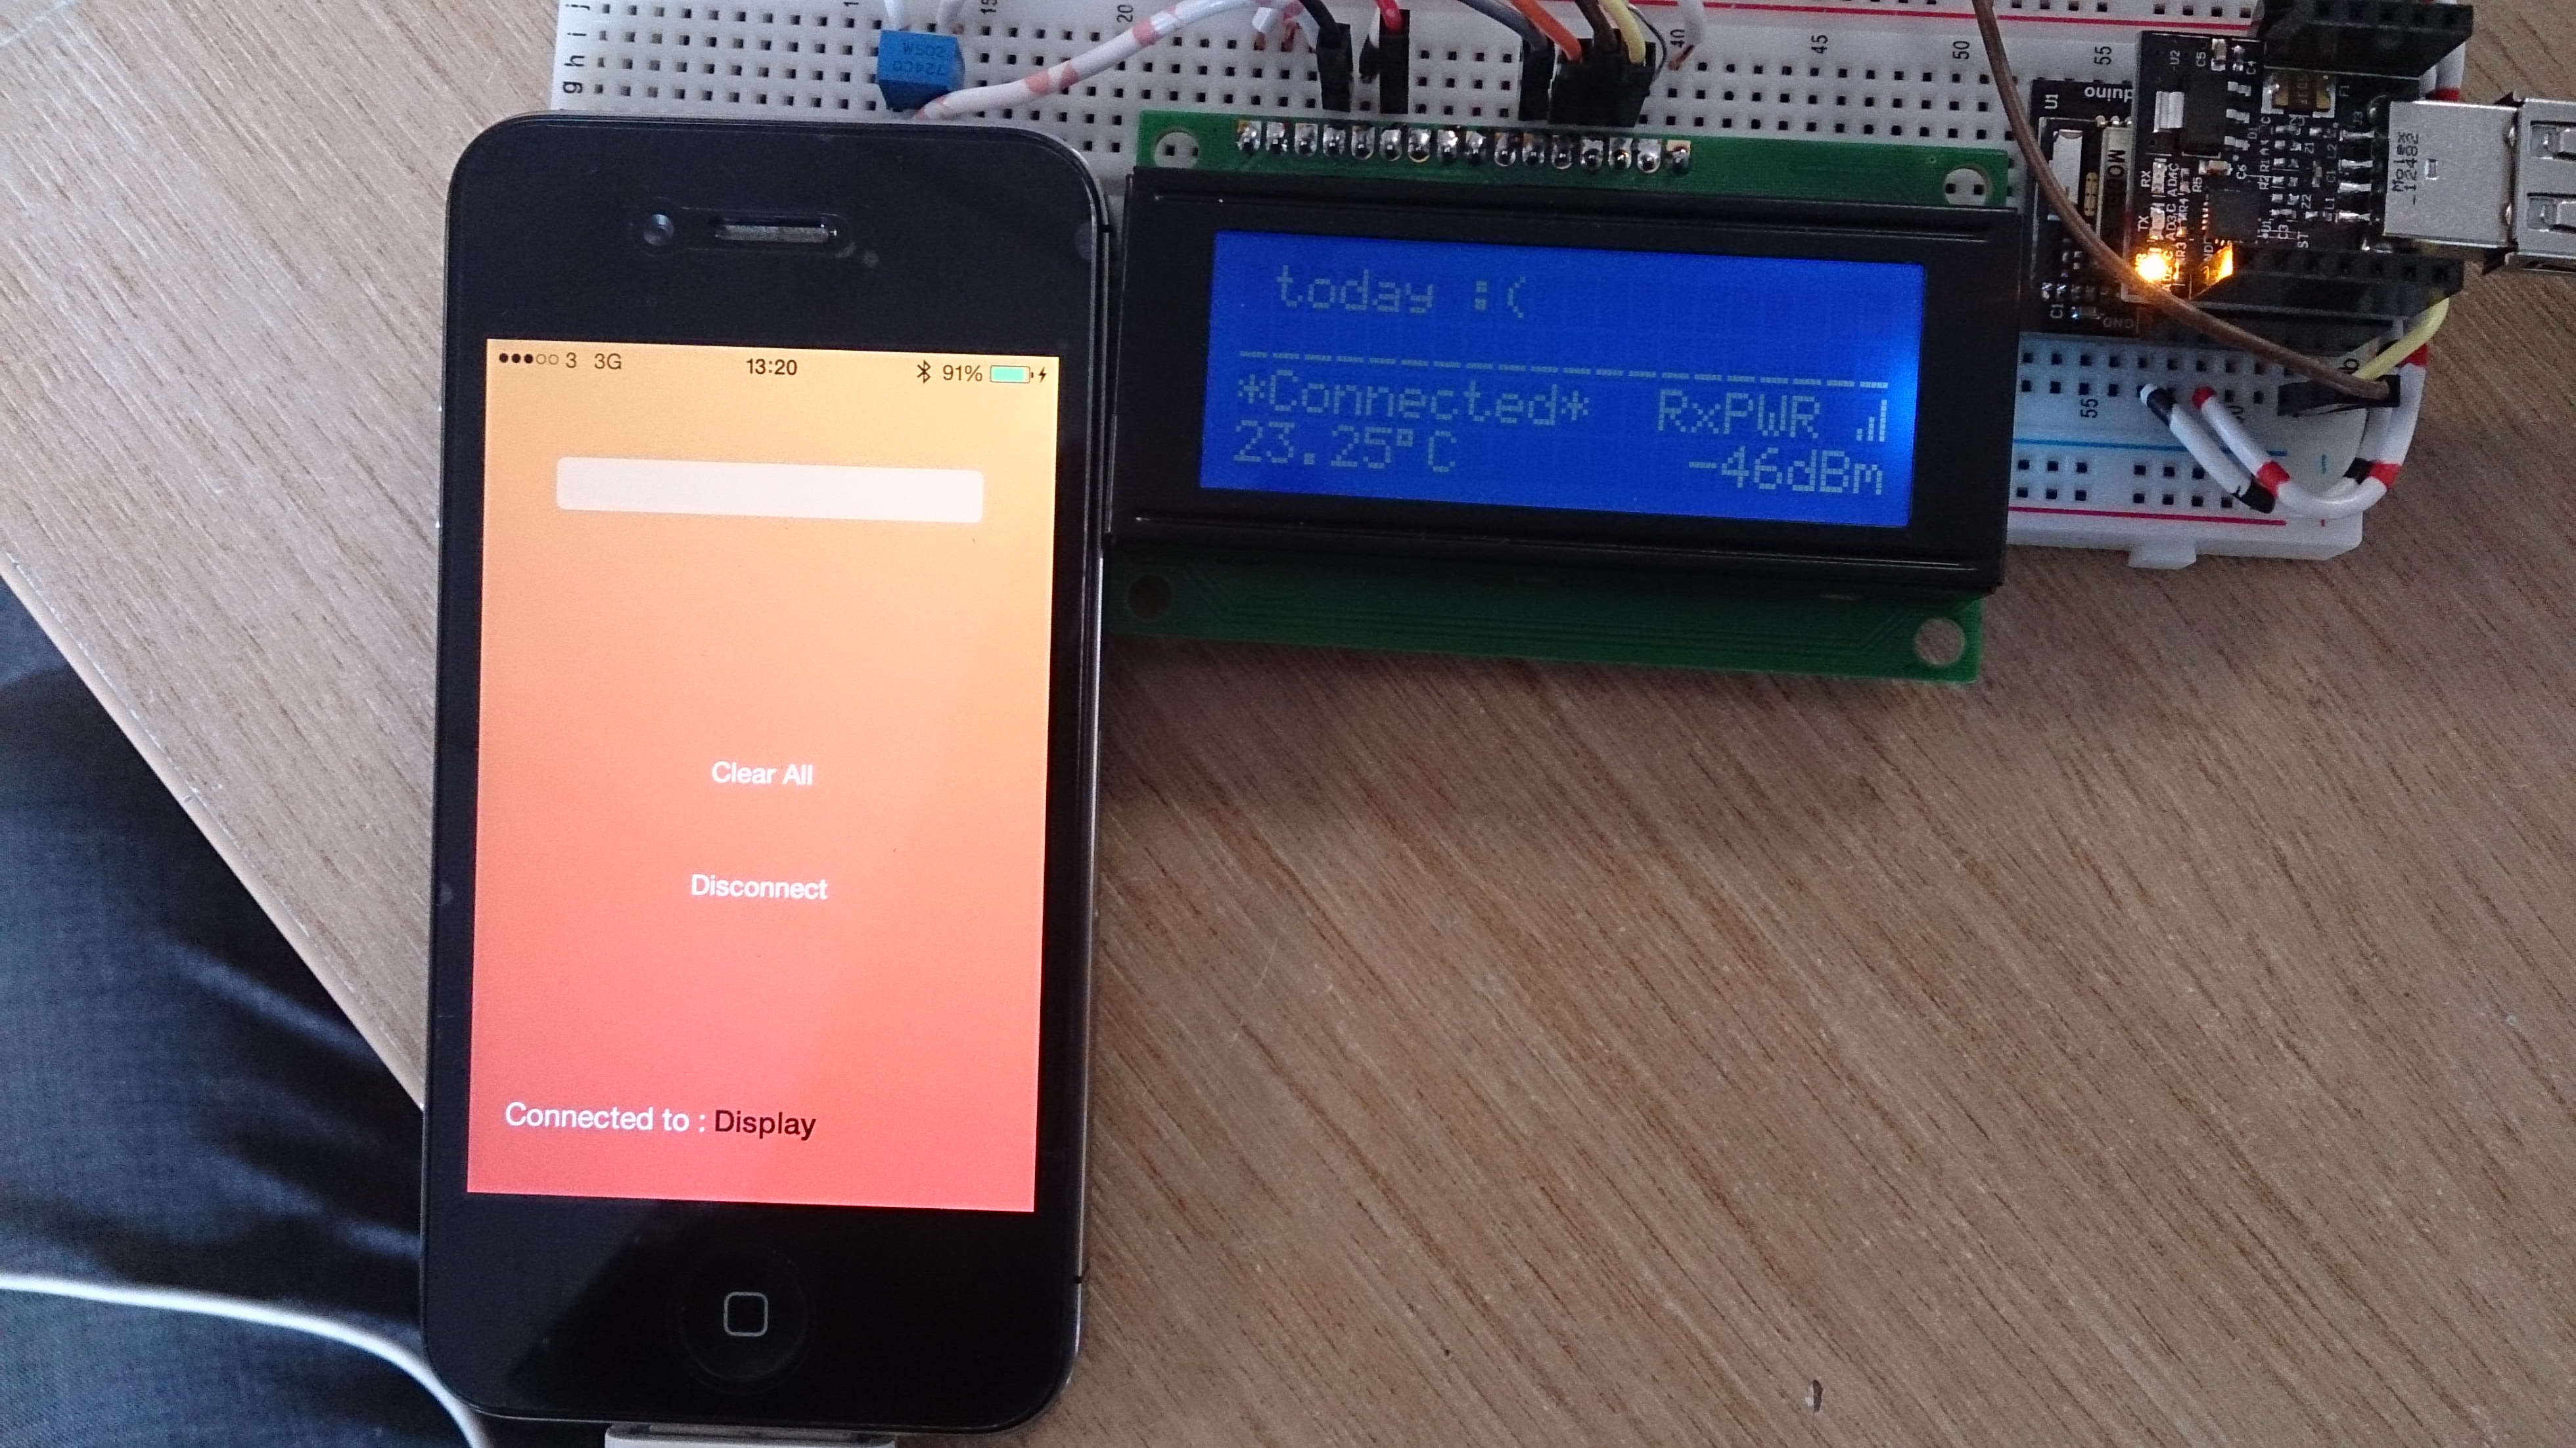 A complete setup (and my leg)
RFduino Setup
If you have never set up and RFduino read this first.
Grab your RFduino, breadboard, LCD screen and potentiometer. Connect them as shown below. Although the diagram shows a 2x16 display I used a 4x20 LCD screen (couldn't find 4x20 on Fritzing!) but this will work with a 2x16 with some minor adjustments to the Arduino sketch.
* LCD RS pin to RFduino pin 5
* LCD Enable pin to RFduino pin 4
* LCD D4 pin to RFduino pin 3
* LCD D5 pin to RFduino pin 2
* LCD D6 pin to RFduino pin 1
* LCD D7 pin to RFduino pin 0
* LCD R/W pin to ground
* 10K resistor:
* ends to +5V and ground
* wiper to LCD VO pin (pin 3)
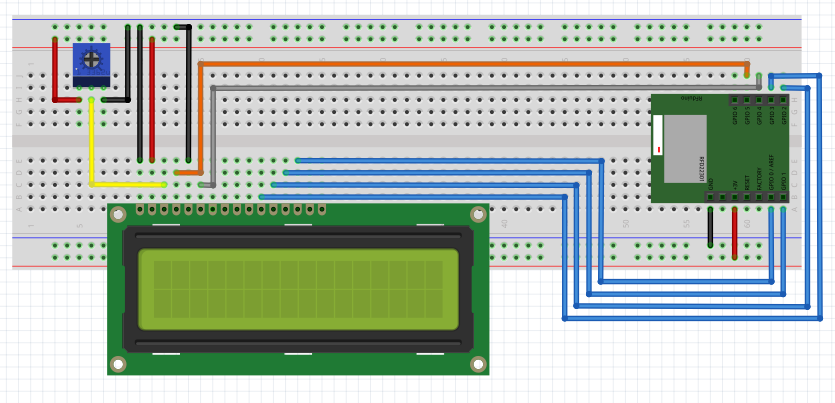 RFduino circuit diagram
The Arduino sketch uses the RFduino library so the BLE hard work is already done for us. Although everything in this example is quite simple there is a fair bit of code because I have implemented the following to make it a bit more interesting: auto one line scrolling text, RSSI signal strength and meter, and a temperature display. I have tried to keep it all separate in the code and have commented on how it all works but if you have any questions post a comment.
The most important part of the Arduino code is the section where the data is received from the BLE connection and how it is all put together in one string. The simplest way I could think of doing this was to put an identifier character at the beginning of every string I sent to the RFduino. When the RFduino receives data it checks the first character (data[0]) and if it is a '1' is knows the following characters in data[] are the first part of the incoming string. If the first character is a '2' it will know the following characters in data[] are be appended to the string of already received characters.
void RFduinoBLE\_onReceive(char \*data, int len) {
  String inputString = "";
  if (data\[0\] == '1') {
    //First packet
    for (int i = 1; i < len; i++) {
      inputString += data\[i\];
    }

    scrollText = "";
    stringStart = stringStop = 0;
    scrollCursor = screenWidth;
    scrollText += inputString;
  }

  if (data\[0\] == '2') {
    //adds any packet after to the string as it is identified with '2'
    for (int i = 1; i < len; i++) {
      inputString += data\[i\];
    }

    scrollText += inputString;
  }
}
As we can only send 12 characters over the standard RFduino setup this method reduces this to 11 characters, as the first character is now the identifier. For example if I wanted to send "Hello world how are you today?" it would be sent like this:
1Hello world
2 how are to
2day?
We are relying solely on the fact that the BLE connection does not miss any transmissions but so far in my testing this method has never failed.
Of course you can also add more check conditions for data[0] which when activated will do other functions. For example, in my full code you will see that when a '0' is received the RFduino resets its display string to the default message that it displays after setup.
Here is the full Arduino code
#include <RFduinoBLE.h>
#include <LiquidCrystal.h>

//scrolling - modified version of http://nishantarora.in/tutorial-arduino-16x2-lcd-how-to-scroll-only-one-line-at-a-time-while-keeping-the-other-constant.naml
LiquidCrystal lcd(5, 4, 3, 2, 1, 0);
int screenWidth = 20;
int screenHeight = 4;
int stringStart, stringStop = 0;
int scrollCursor = screenWidth;
//default screen Text
String scrollText = "No messages today :(";

//signal params
int signalLevel = 0;
bool showSignal = false;

//custom graphics for LCD
byte sigHigh[8] = {
  B00001,
  B00001,
  B00001,
  B00101,
  B00101,
  B10101,
  B10101,
};
byte sigMedium[8] = {
  B00000,
  B00000,
  B00000,
  B00100,
  B00100,
  B10100,
  B10100,
};

byte sigLow[8] = {
  B00000,
  B00000,
  B00000,
  B00000,
  B00000,
  B10000,
  B10000,
};

void setup()
{
  //create custom characters for LCD
  lcd.createChar(0, sigHigh);
  lcd.createChar(1, sigMedium);
  lcd.createChar(2, sigLow);

  lcd.begin(screenWidth,screenHeight);
  lcd.print(scrollText);

  //RFDuino setup
  RFduinoBLE.deviceName = "Display";
  RFduinoBLE.advertisementData = "data";
  RFduinoBLE.advertisementInterval = MILLISECONDS(300);
  RFduinoBLE.txPowerLevel = -20;  // (-20dbM to +4 dBm)

  // start the BLE stack
  RFduinoBLE.begin();
}

void loop()
{
  //Scrollig display*******************
  lcd.setCursor(0,0);
  lcd.print("                    ");
  lcd.setCursor(scrollCursor, 0);
  lcd.print(scrollText.substring(stringStart,stringStop));

  if(stringStart == 0 && scrollCursor > 0){
    scrollCursor--;
    stringStop++;
  } else if ((stringStart == stringStop) || (stringStart == scrollText.length())){
    stringStart = stringStop = 0;
    scrollCursor = screenWidth;
  } else if (stringStop == scrollText.length() && scrollCursor == 0) {
    stringStart++;
  } else {
    stringStart++;
    stringStop++;
  }
  //***********************************

  RFduino_ULPDelay( SECONDS(0.3) ); //delay

  //temperature************************
  float temp = RFduino_temperature(CELSIUS);
  temp-=6.5;      //calibrattion for room temperature(ish!!!)
  lcd.setCursor(0, 3);
  lcd.print(temp);
  lcd.print((char)223); //degrees symbol
  lcd.print("C");
  //**********************************

  //Signal level**********************
  if (showSignal == true){
    lcd.setCursor(14,3);
    lcd.print(signalLevel);
    lcd.print("dBm");

    lcd.setCursor(13,2);
    lcd.print("RxPWR ");

//for graphic representation of signal
    if (signalLevel >= -60){
       lcd.write(byte(0));
    }
    if ((signalLevel < -60) && (signalLevel >= -75)){
       lcd.write(byte(1));
    }
    if (signalLevel < -75){
       lcd.write(byte(2));
    }
  }
  //**********************************
}

void RFduinoBLE_onConnect()
{
  lcd.setCursor(0,1);
  lcd.print("____________________");  //clears one line of screen
  lcd.setCursor(0, 2);
  lcd.print("*Connected*");
  showSignal = true;
}

void RFduinoBLE_onDisconnect()
{
  lcd.setCursor(0,2);
  lcd.print("Device Disconnected!");
  showSignal = false;
  delay(2000);
  lcd.setCursor(0,2);
  lcd.print("                    ");
  lcd.setCursor(0,1);
  lcd.print("                    ");
  lcd.setCursor(14,3);
  lcd.print("      ");
}

// returns the dBm signal strength indicated by the receiver after connection (-0dBm to -127dBm)
void RFduinoBLE_onRSSI(int rssi)
{
  signalLevel = rssi;
}

void RFduinoBLE_onReceive(char *data, int len)
{
  String inputString = "";
    if (data[0] == '0'){
      //clears all data
      scrollText = "No message today :(";
      stringStart = stringStop = 0;
      scrollCursor = screenWidth;
    }
   if (data[0] == '1'){
     //First packet
     for (int i = 1; i < len; i++) {
      inputString += data[i];
      }
      scrollText = "";
      stringStart = stringStop = 0;
      scrollCursor = screenWidth;
      scrollText += inputString;
    }

    if (data[0] == '2'){
      //adds any packet after to the string as it is identified with '2'
     for (int i = 1; i < len; i++) {
      inputString += data[i];
      }
      scrollText += inputString;
    }
}
Load up the sketch on your RFduino and turn it on. If all has worked correctly you should be greeted by the following screen and if you have a standard RFduino app on your phone you should see "Display" come up when you search for devices.
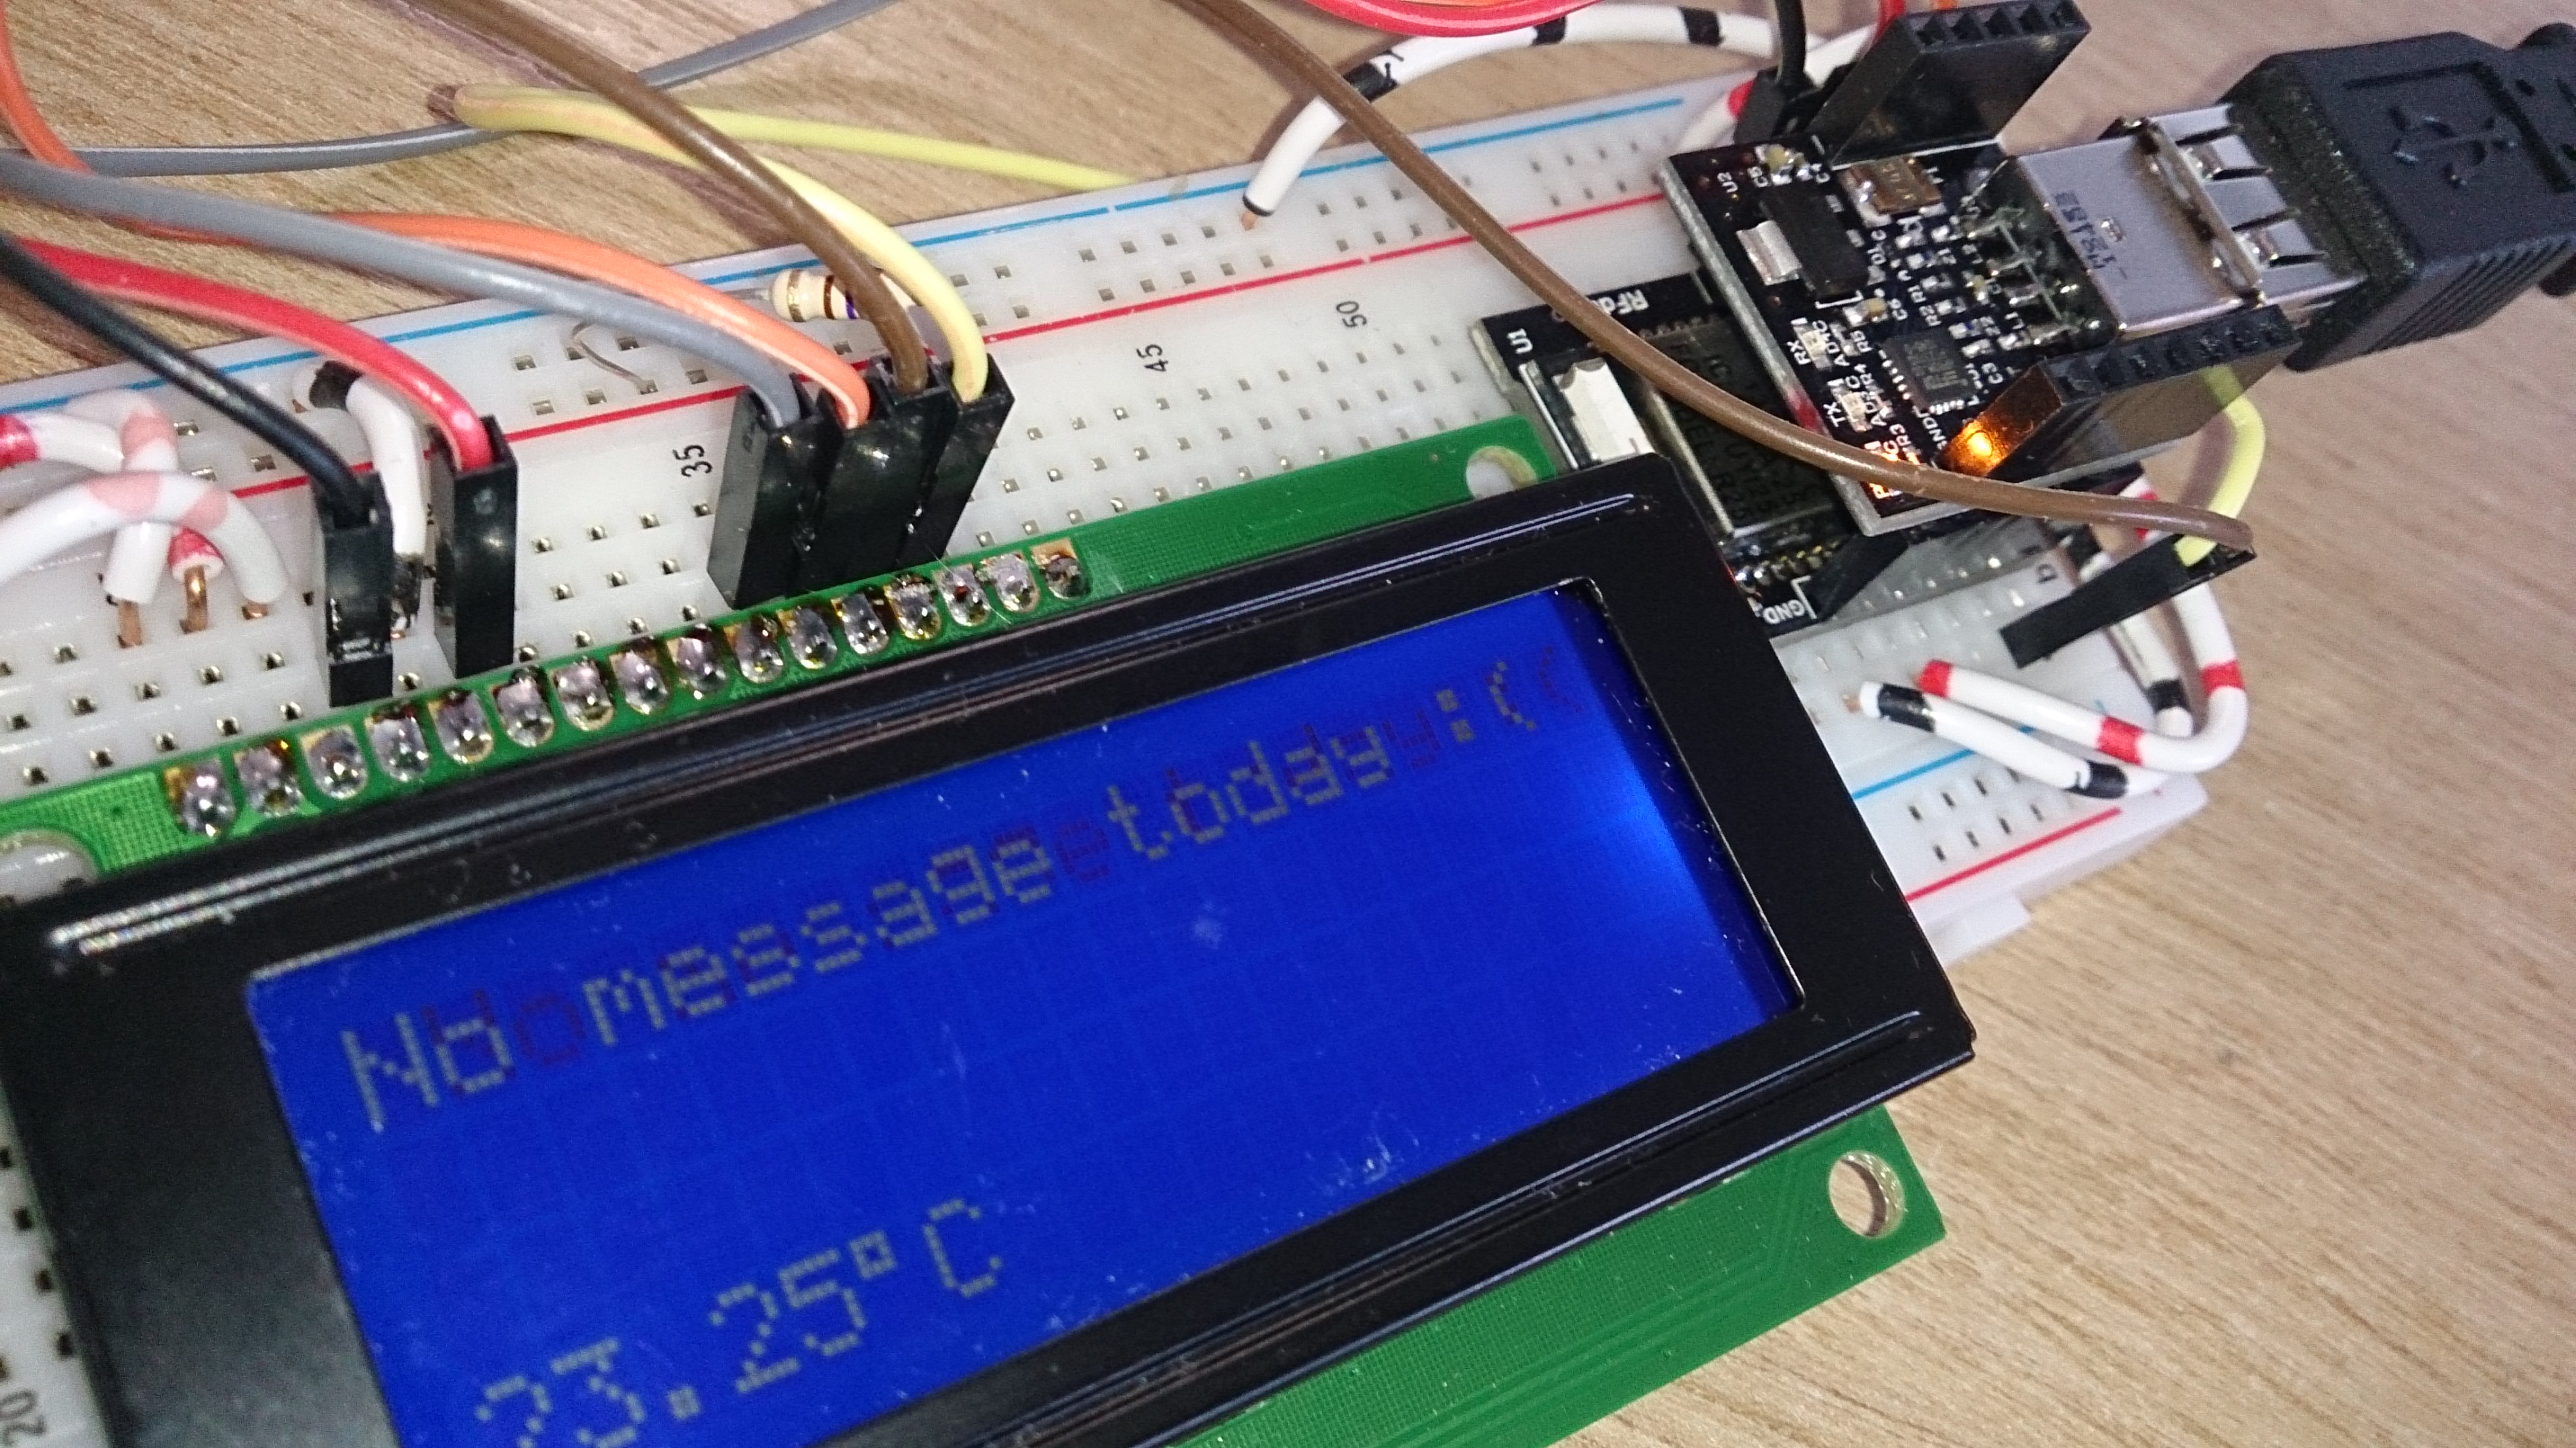 All systems go
iOS Application
RFduino have been kind enough to produce a bare bones iOS framework that we can use to get our app started. However, there a few setup steps required before it will work correctly.
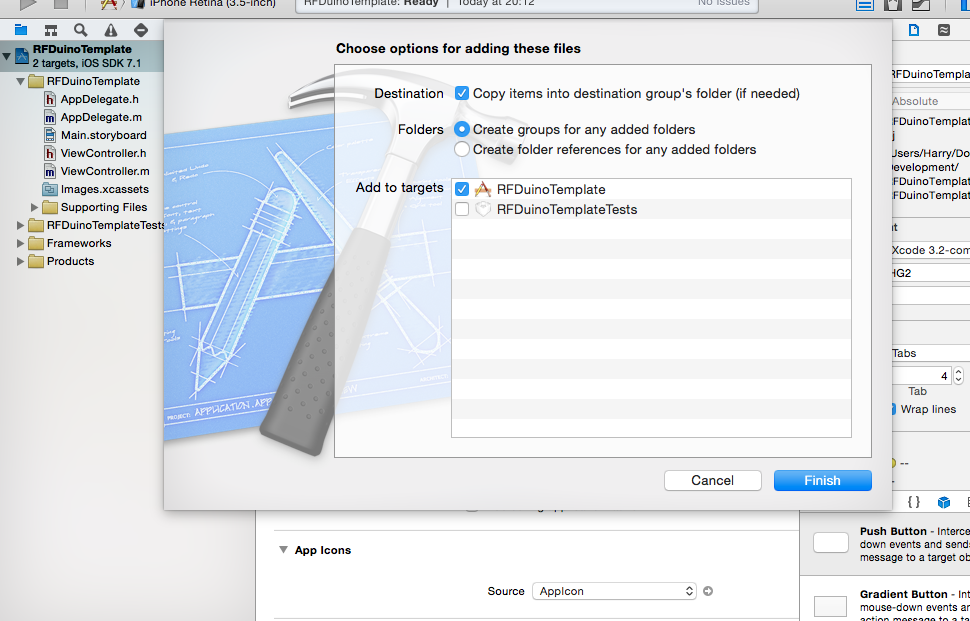
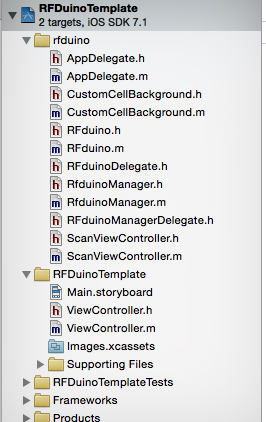
1. Download the zip from GitHub here. You need the following folder:
RFduino/iPhone Apps/RFduino
Make a new iPhone project with a single view. Drag the RFduino folder from the above file path and make sure you copy the files and add to the project target.
 Copy the RFDuino folder into your project...
2. Delete your original AppDelegate.h and AppDelegate.m files. Don't worry there are replacement AppDelegate files in the imported RFduino folder that will take over the role of AppDelegate.
3. In the ScanViewController.m file replace didLoadServiceRFduino function with the code below.
- (void)didLoadServiceRFduino:(RFduino *)rfduino
{
    UIStoryboard *storybord = [UIStoryboard storyboardWithName:@"Main" bundle:nil];
    AppViewController *viewController =[storybord instantiateInitialViewController];

    viewController.rfduino = rfduino;

    loadService = true;
    [[self navigationController] pushViewController:viewController animated:YES];
}
4. In the ScanViewController.m file replace all occurrences of AppViewController with ViewController.
5. Add the CoreBluetooth framework to your project. Project Page>Build Phases tab>Link Binary with Libraries>Add CoreBluetooth
6. Open ViewController.h and replace the contents with the following code. This adds a property for rfduino and sets the ViewController as a delegate of RFduinoDelegate.
#import <UIKit/UIKit.h>
#import "RFduinoDelegate.h"
#import "RFduino.h"

@interface ViewController : UIViewController<RFduinoDelegate>

@property(nonatomic, strong) RFduino *rfduino;

@end
7. Open ViewController.m and add a @synthesize for the rfduino property.
Run the app with the RFduino on and you should see that the RFduino is displayed in the list.
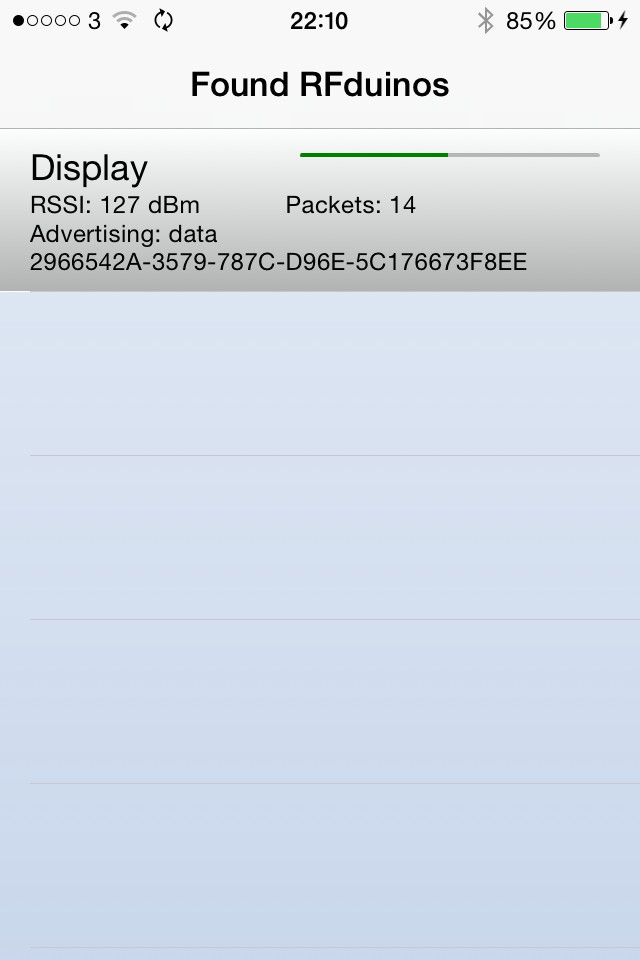 A familiar view hopefully...
If you select the displayed RFduino, the app will open a new blank view. Time to change that!
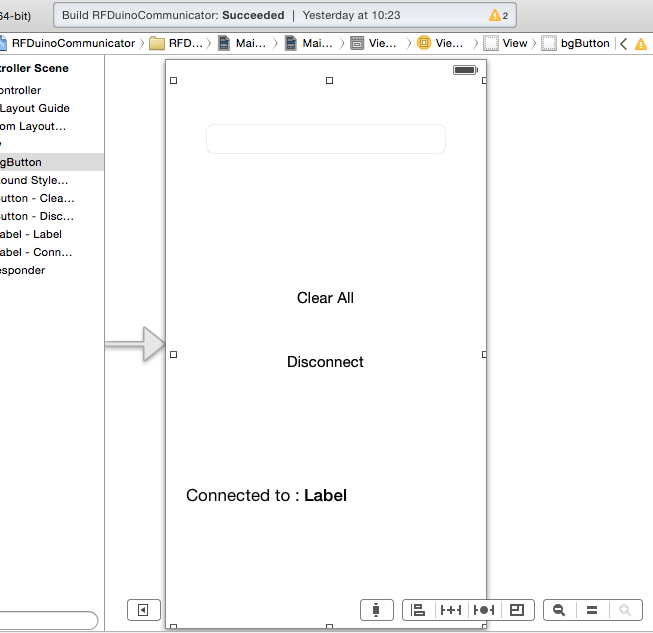
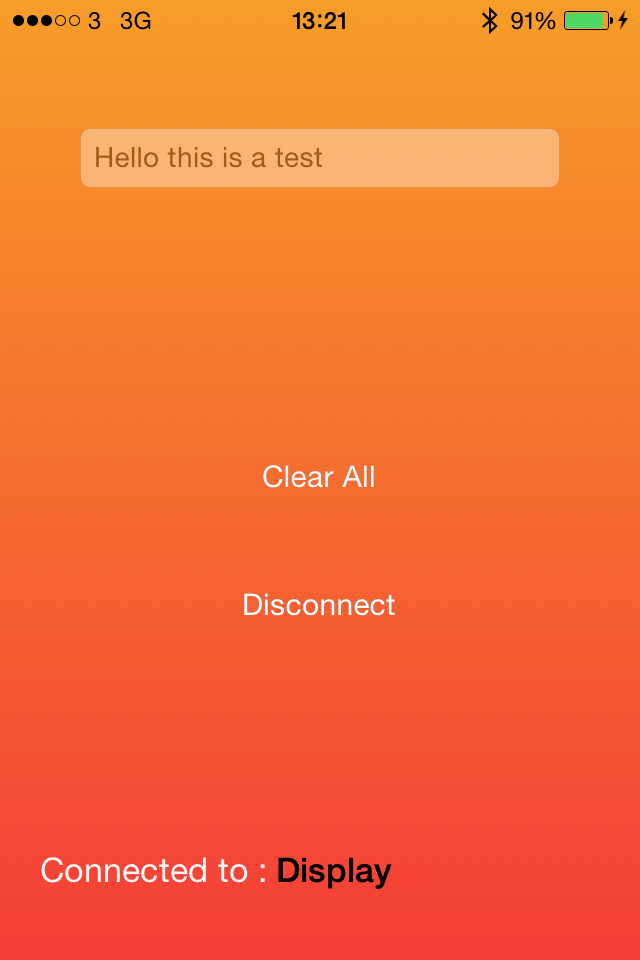
Open Main.storyboard. Add two buttons ("Clear All", "Disconnect"), two labels ("Connected to:", default) and a text field. Arrange them as below.
I also decided to add a gradient background to make things look a bit more interesting. If you want to do this add a new objective C class called Background Gradient and fill in the .h and .m files as below.
#import <Foundation/Foundation.h>
#import <QuartzCore/QuartzCore.h>

@interface BackgroundGradient : NSObject

+(CAGradientLayer*) blueGradient;

@end
#import "BackgroundGradient.h"

@implementation BackgroundGradient

//Blue gradient background
+ (CAGradientLayer*) blueGradient {

    UIColor *colorOne = [UIColor colorWithRed:(247/255.0) green:(157/255.0) blue:(40/255.0) alpha:1.0];
    UIColor *colorTwo = [UIColor colorWithRed:(245/255.0)  green:(60/255.0)  blue:(55/255.0)  alpha:1.0];

    NSArray *colors = [NSArray arrayWithObjects:(id)colorOne.CGColor, colorTwo.CGColor, nil];
    NSNumber *stopOne = [NSNumber numberWithFloat:0.0];
    NSNumber *stopTwo = [NSNumber numberWithFloat:1.0];

    NSArray *locations = [NSArray arrayWithObjects:stopOne, stopTwo, nil];

    CAGradientLayer *headerLayer = [CAGradientLayer layer];
    headerLayer.colors = colors;
    headerLayer.locations = locations;

    return headerLayer;

}

@end
We will use that later. Now lets add some properties to the ViewController.h for the rfduino, text field and UILabel for the device name that we will display.
#import <UIKit/UIKit.h>
#import "RFduino.h"
#import "RFduinoDelegate.h"

@interface ViewController : UIViewController<RFduinoDelegate>

@property(nonatomic, strong) RFduino *rfduino;
@property (nonatomic,strong) IBOutlet UITextField *textField;
@property (nonatomic, strong)  UILabel *deviceName;

@end
Lets do something with these properties. Open the ViewController.m file and start to copy the below code into the file. This isn't all of the file btw so don't try to run it just yet!
#import "ViewController.h"
#import "BackgroundGradient.h"

@interface ViewController ()

@end

@implementation ViewController

@synthesize deviceName, rfduino, textField = _textField;

- (void)viewDidLoad
{
    //hides the navigation bar
    [super viewDidLoad];
    [self.navigationController setNavigationBarHidden:YES];

    //set background colour gradient
    CAGradientLayer *bgLayer = [BackgroundGradient blueGradient];
    bgLayer.frame = self.view.bounds;
    [self.view.layer insertSublayer:bgLayer atIndex:0];

    //Device Name
    NSString *deviceText = [[NSString alloc] initWithFormat:@"%@", rfduino.name];
    deviceName.text = deviceText;
}
Hopefully this all makes sense. We are just synthesising the properties we created earlier, hiding the navigation bar and setting up both the background colour gradient and the device name label. If you don't want a gradient background just miss out the middle three lines.
Lets connect some of this up. Open the main storyboard and connect the default label to the outlet for deviceName (ctrl+click and drag from the yellow box onto the blank label, select deviceName under outlets). Then do the same for the textField, linking it to the textField.
While the textField is highlighted also change some of the parameters in the inspector to these. 
Now open the assistant editor in the top right of Xcode so both the main storyboard and ViewController.m are open. Ctrl drag from the Clear All button to an empty space in ViewController.m. Label the newly created IBOutlet clearAll and add the following code.
- (IBAction)clearAll:(id)sender {
    //Clears all data from string on the arduino and text field
    [_textField resignFirstResponder];
    NSString *identifier = @"0";
    NSData *data = [identifier dataUsingEncoding:NSASCIIStringEncoding];
    [rfduino send:data];
    _textField.text = nil;
}
Do the same for disconnect using the below code.
- (IBAction)disconnectDevice:(id)sender {
    [_textField resignFirstResponder];
    [rfduino disconnect];
}
Finally, we need to control the textField. The easiest way to do this is to set the textField's delegate as the ViewController. With the storyboard open in the standard editor view click on the textField so it is highlighted.Open the connection inspector and drag the plus symbol next to the outlet delegate to the ViewController underneath where it says ViewController Scene.
I thought the best way to trigger the method to send that typed data would be to use the send key on the keyboard. To do this implement the code below. Hopefully the comments will explain what is going on. I'm not saying any of this is best practice by the way but it has worked for me. Please feel free to improve it and comment back to me!
//sends data when "send" is pressed on keyboard
- (BOOL)textFieldShouldReturn:(UITextField *)textField
{
    _textField = textField;
    //max data is 12 chars
    //1 is taken up for identifier

    //remove keyboard
    [_textField resignFirstResponder];

    //work out the amount of packets that need to transmitted
    //int a = (dividend + (divisor - 1)) / divisor;
    NSInteger packets = (((_textField.text.length)+ (11-1))/11);

    //Splits the text string into 11-character substrings then sends them with associated packet number
    for (int i = 0; i<(packets) ; i++){
        if ((11*(1+i)) < _textField.text.length){
            NSInteger packetIdentifier = 2;
            if (i == 0) packetIdentifier = 1; //first packet to be sent needs identifier 1
            NSString *subStr = [_textField.text substringWithRange:NSMakeRange((0+(11*i)), 11)];
            NSString *identifier = [NSString stringWithFormat:@"%ld", (long)packetIdentifier];
            NSString *sendPartial = [identifier stringByAppendingString:subStr];
            NSData *data = [sendPartial dataUsingEncoding:NSASCIIStringEncoding];
            [rfduino send:data];
        }else{
            NSInteger packetIdentifier = 2;
            if (i == 0) packetIdentifier = 1;  //first packet to be sent needs identifier 1
            NSString *subStr = [_textField.text substringWithRange:NSMakeRange((0+(11*i)), (_textField.text.length-(0+(11*i))))]; //corrects the packet length incase the string is not 11 characters long
            NSString *identifier = [NSString stringWithFormat:@"%ld", (long)packetIdentifier];
            NSString *sendPartial = [identifier stringByAppendingString:subStr];
            NSData *data = [sendPartial dataUsingEncoding:NSASCIIStringEncoding];
            [rfduino send:data];
        }
    }
    return YES;
}
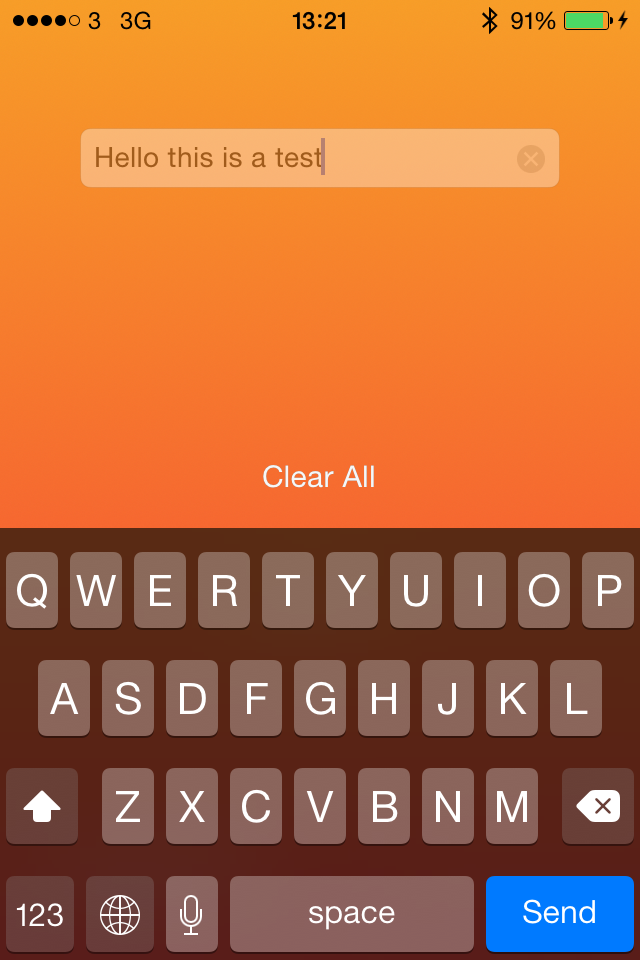
Unless I have forgotten something this will now work. Run the app with the RFduino on and send strings of length >12 to your heart's content. It should look like this when complete.
You may find it annoying if you want to dismiss the keyboard without sending a message. The best way I found to do this was to make a transparent, unlabelled button that is the size of the screen. Position it behind all other buttons then implement the following IBAction when it is pressed.
- (IBAction)removeKeyboard:(id)sender {
    //if user presses anywhere but the keyboard it will disappear
    [_textField resignFirstResponder];
}
All should now work perfectly. I decided to make the text of my buttons and labels white to make it look a bit nicer.
Hopefully that was useful. This is my first attempt at iOS so please let me know if I am incorrect in any way and I will try to adapt and learn!