Implementing Alternative App Icons In SwiftUI
For one of my personal apps, I wanted to do something fun and add alternate app icons. Well, it was really to try and decide which icon I liked best but anyways… turns out it's relatively easy to implement.
Let's get started. Firstly, create a new SwiftUI Xcode project and let’s add some app icons by opening the Asset Catalog, then select AppIcon and add your default icon. Luckily, since Xcode 14, we do not need to add more than one asset for each icon, just one 1024×1024, which makes this much quicker and easier. I would check at this point the default app icon shows up correctly before proceeding.
Tip: I generated my images online and they were 1028x1028, therefore needing to be resized. This can be done very quickly using Mac OS’ Preview application in Tools > Adjust Size...
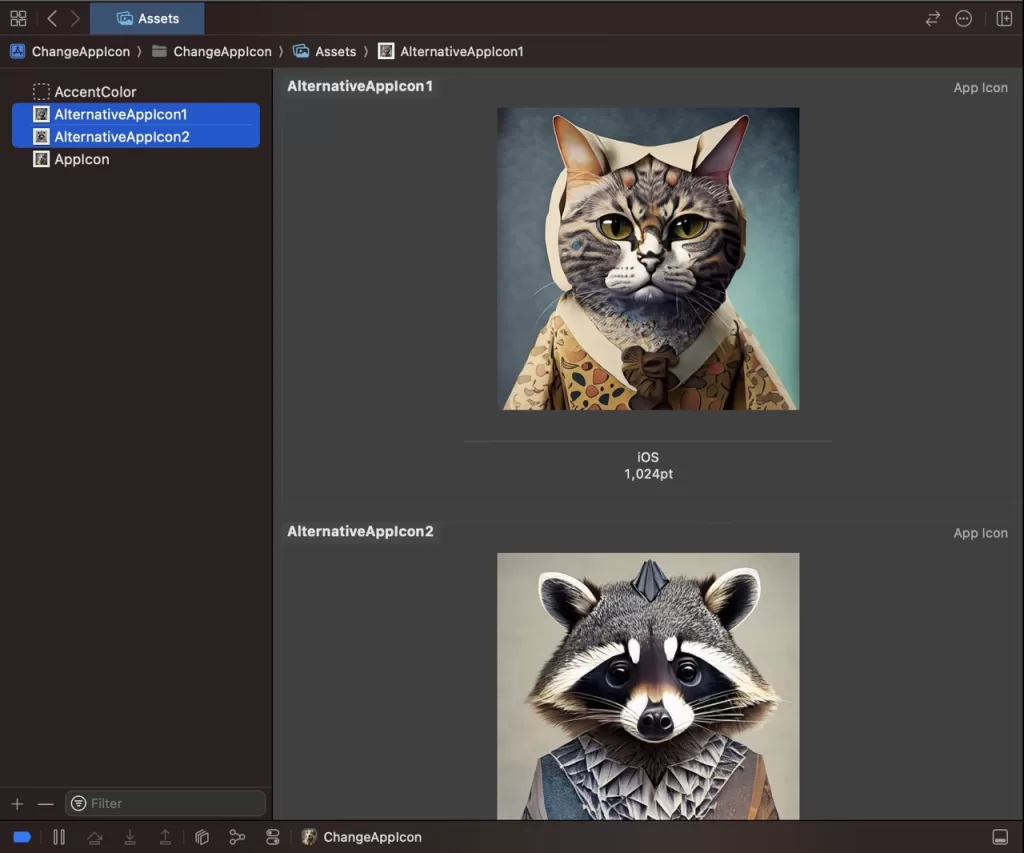
Now, let’s add some alternate icons. Tap the + icon underneath the assets and select iOS > iOS App icon to create a new app icon asset or highlight the AppIcon and copy paste as many times as you need for the amount of alternate icons you have. Drag the images in for the alternate app icons and then rename the icons according to your style. For example I have the following:
Now our assets are ready, we need to inform the asset compiler we want to use these assets as alternative app icons. Navigate to the app target’s Build Settings. Near the top of the settings interface make sure you have the ‘All‘ setting selected and then search for Asset Catalog Compiler to only show the settings we are interested in.
There are two ways to enable alternative icons, you can either set the setting ‘Include All App Icon Assets’ to Yes which will do as it says, enabling all assets in the asset catalog that are App Icon types to be used. Or you can add each icon set explicitly in the ‘Alternate App Icon Sets’ setting. In this example I have opted for explicit, to show how it works.
Tip: Explicit selection can offer a bit of safety, for example, an icon may be added to the asset catalog that isn’t ready to be used that would now be available if the include all setting is used.
To add the assets explicitly we can do this:
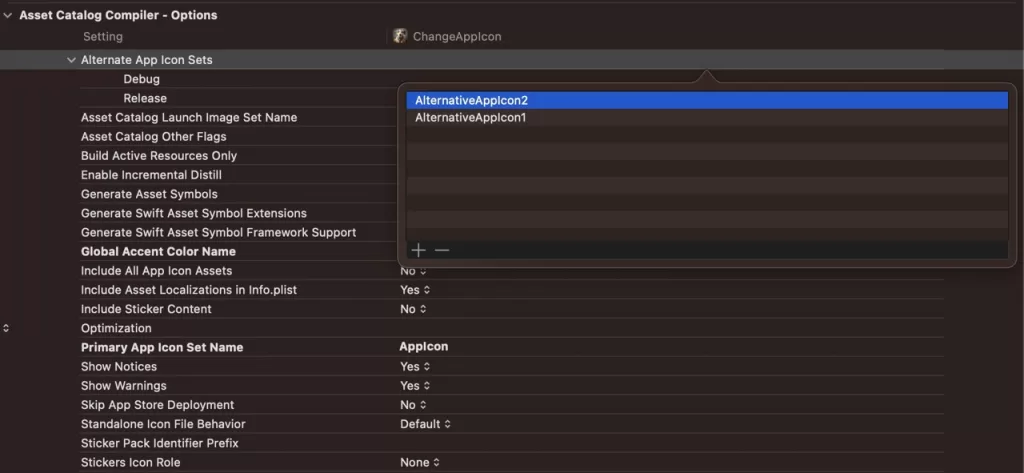
Note: Different values can be entered for your different configurations (Debug, Release etc).
That should complete our work with the Asset Catalog Compiler, so now open the generated ContentView SwiftUI file and let's write some code to change our app icon.
import SwiftUI

struct ContentView: View {
    private let application = UIApplication.shared

    var body: some View {
        if application.supportsAlternateIcons {
            Button("Change App Icon") {
                Task { @MainActor in
                    do {
                        try await application.setAlternateIconName("AlternativeAppIcon1")
                    } catch {
                        print("error: \(error)")
                    }
                }
            }
        } else {
            Text("Alternate icons not supported")
        }
    }
}

#Preview {
    ContentView()
}
Firstly we check that our app supports alternate app icons with the supportsAlternateIcons property on UIApplication. I’m not sure when this would be false on iOS or iPad but it will return false if running on (Designed for iPad) Mac OS for example.
If supported, we show a button where the action will change the app icon using the function setAlternateIconName. This function takes an optional String as an argument. Pass either the string of the desired alternate icon to use or nil if wanting to set the icon back to its original default value.
Looking at the documentation we can see the setAlternateIconName function is asynchronous and throws, so we need to wrap it in a task and use a do-try-catch statement. As this is a UI based operation we also need to make sure we call it on the main thread, so add the @MainActor annotation to the task. I would also recommend using a catch here and not try?, as the error will provide information if the system cannot find your asset for example. There is also a closure based version of this function if not using async await.
When running the app in the simulator and tapping the button, we should see:
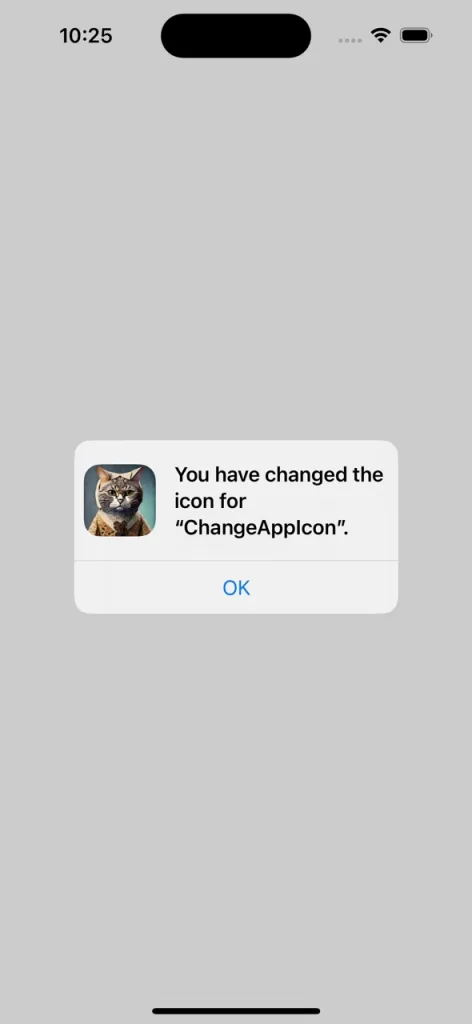
There is currently no way to avoid the alert when changing the app icon, one of the limitations of this iOS feature. So this method would not be a good choice to try and emulate Apple's clock or calendar app icon functionality, more of just a customisation nicety for our users.
As nice as this is, it currently only lets us change the icon to the alternate once with no way to change back. We can call setAlternateIconName passing nil to set to default but how do we know we are currently using an alternate icon? Luckily there is a property alternateIconName we can check. It will return the string of the alternate icon currently in use or nil if using the default icon. Let's modify the code to use this.
Note the change to application.setAlternateIconName also.
...
    var body: some View {
        if application.supportsAlternateIcons {
            Button("Change app icon") {
                Task { @MainActor in
                    do {
                        try await application.setAlternateIconName(alternateIconNameToSet)
                    } catch {
                        print("error: \(error)")
                    }
                }
            }
        } else {
            Text("Alternate icons not supported")
        }
    }

    private var alternateIconNameToSet: String? {
        if application.alternateIconName == nil {
            return "AlternativeAppIcon1"
        } else {
            return nil
        }
    }
...
This will allow our button tap to alternate between the default icon and one alternative icon. At this point I must point out this is a simple and dirty implementation, using raw strings for names and a print in the catch closure etc. In a real production project I would suggest using an enum for your alternate icon names, proper error handling as well as encapsulating the logic in something like a view model.
In a subsequent post I will show a more advanced way to use this API, reading what icons are available, listing them and selection.
All resources and project files for this post are on GitHub here.